
Sudoku Strategy
Today's Dragon Tip
Learn the basicsLook through our range of easy to follow guides to puzzle solving strategies, make sure you are up-to-speed on all the useful ways of solving Sudokus.
Read More
There are only a few strategies that you need to master in order to solve all Sudoku puzzles. Please also take a look at our Sudoku introduction page on terminology and also our theory page. You can share your tips and experiences on our strategy message forum. Here are the techniques you need for most puzzles, the most difficult ones however need advanced level strategies which are fully explained on our advanced page.
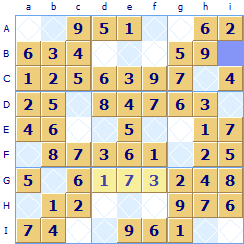
 Looking at the second row (B) all the squares except the first one Ba have been allocated so the missing number 4 has no choice but to go in the square
 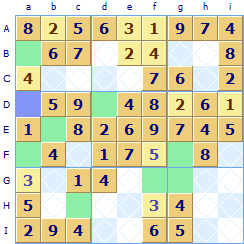 In this partially solved Sudoku there are quite a few readily solvable squares. Look at the purple square
 Only square Sudoku rule
Often you will find that within a group there is only one remaining place that can take a particular number. For example if a group has seven squares allocated with only two numbers left to allocate it is quite common that an intersecting (or shared) group forces a number to go in one of the squares and not the other one. You are left with an only square within a group for a number to go in. This is different to the 'single possibility' rule where we looked at individual squares rather than groups.
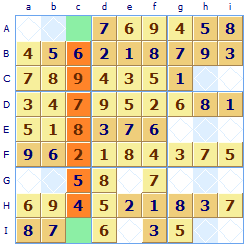 In this puzzle column c (highlighted) has seven numbers allocated. The missing numbers are 1 and 3. But you can see that there is already a 3 in row I (square If) so a 3 cannot go in square Ic, the 3 must go in the other square Ac it is the only square in column c where a 3 can be allocated.
You will often find that the same square can be solved by the ‘single possibility’ rule as well as the ‘only square’ rule. It doesn't matter which rule you use, as long as the square is solved. Note: Whenever there are eight allocated in a group with only one remaining empty you can assign a symbol by applying either the 'only choice', 'single possibility' or 'only square' rules as all of them come down to the same thing. Sudoku allows squares to be solved in different ways using different strategies.
Two out of three strategy
This makes extensive use of the Only Square rule. Some Sudoku authors refer to it as ‘slicing and slotting’. It is a quick way of solving squares as it can be done in your head by scanning the puzzle grid. It almost always finds a square or two that can be solved. At the heart of the technique is to take groups of three rows and columns in turn, working methodically through the whole grid. First look for all the 1s then all the 2s, 3s etc. all the way through to the 9s. Here's an example of how it works, for more details look at our 2 out of 3 strategy page.
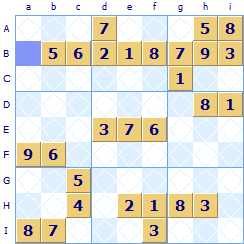
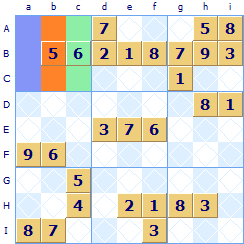
 Look at the top three rows where the 1s are located - they are in row A column e (Ae) and Row C column a (Ca)
There is no 1 in row B, it must go in one of the blank squares. Because of the 1 in Ae it can not go in any other of the squares in region Ad that is Bd; Be or Bf. By elimination there is only one square a 1 can go in row B and that is in the highlighted square Bi.
Using the same logic for the following three rows D; E; F there is again two of them with a 1 in them: squares Eh and Ff. There is a 1 missing from row D and because of the 1 in Eh it can't be in Di, 1 must be assigned to Dc. For the last three rows there are already three 1s Gd; Hb and Ig so there is no 1 remaining to be allocated.
Look at the top three rows where the 1s are located - they are in row A column e (Ae) and Row C column a (Ca)
There is no 1 in row B, it must go in one of the blank squares. Because of the 1 in Ae it can not go in any other of the squares in region Ad that is Bd; Be or Bf. By elimination there is only one square a 1 can go in row B and that is in the highlighted square Bi.
Using the same logic for the following three rows D; E; F there is again two of them with a 1 in them: squares Eh and Ff. There is a 1 missing from row D and because of the 1 in Eh it can't be in Di, 1 must be assigned to Dc. For the last three rows there are already three 1s Gd; Hb and Ig so there is no 1 remaining to be allocated.
Now look at the 2s in these three sets of three rows. In rows A; B; C there are 2s in Ai and Cb so there is a 2 missing in row B, however in this case there are three unallocated squares Bd; Be and Bf so it can't be quickly decided in which one of these the 2 should go. The same happens in rows D; E; F there are two 2s but both Ed and Ef are possible. Finally in G; H; I there are two 2's Gg and Hc and so there is a 2 missing in row I. The existing 2's mean there is only one place it can go - square Id. You can then continue this scan through all rows then all columns in groups of three and then through all the numbers 1 through 9. Whenever you allocate a square this may unlock other squares so it is worth doing the whole procedure again over the whole grid.
see it in Sudoku Dragon click here...
The procedure is to scan rows and columns in groups of three and look to see where if anywhere the number being scanned has been allocated. If you find two out of the three then you know that the missing number can only go in only one of three squares in this row (or column), and more often than not only one of these is possible and must be allocated there. It will find squares that you could also have found using the only choice, only square and single possibility rules. The way it works is that three rows or columns consist of three regions each of these can only take the symbol once.
When using the Sudoku Dragon software you can use the automatic allocation feature to automatically highlight and solve squares that can be solved with the ‘only choice’, ‘single possibility’ and ‘only square’ rules, leaving you free to concentrate on solving the harder squares.
Sub-group exclusion Sudoku rule
More rarely needed in Sudoku, but exceptionally useful is the sub-group exclusion rule. This takes a lot more explanation as instead of 'forcing' a number in a square, it is an application of logic that knocks out options that at first sight looked possible. By excluding one possibility for a square may mean there is only one remaining possibility, so the square can be safely set to the remaining single possibility. Here's an example of the sub-group rule.
 Here is a brief example using the
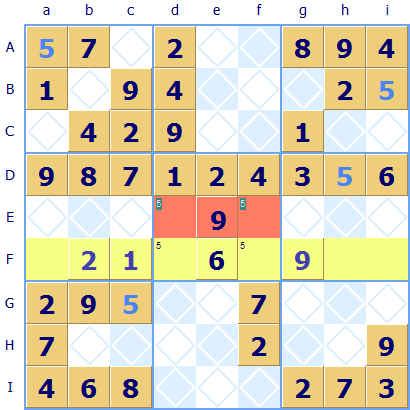 Scaling up to a regular 9x9 Sudoku example, subgroup exclusion can be applied to the central region Dd. It is the sub-group of the central region with the highlighted row F that is of interest. Look at the squares in row F that a 5 can go, it can't go in Fa (because of Aa) nor in Fh (because of Dh) nor in Fi (because of Bi). That only leaves Fd and Ff which form a shared sub-group with the central region Dd. The subgroup exclusion rule requires that a 5 can not go in the other unallocated squares in that region Dd highlighted in red: Ed or Ef.
Hidden Twin exclusion Sudoku rule
The twin exclusion rules are useful for more challenging Sudoku puzzles. It is the strategy to use when simpler strategies have been tried and you are still stuck. In essence it is all about spotting matching patterns of possibilities in a group (row, column or region). Spotting these groups takes time and it is difficult to keep track of these in your head, so this is where you need pencil and paper. The rule applies equally well to groups of three, four or more squares but pairs are more commonly find.
If you have two or more unallocated squares in a region and there are two numbers that can only go in the same two squares and no others in that group then you have a twin. This does not directly help to allocate squares as the number could go in either of them. However, if the two squares have another possible number then this number can be safely eliminated as an option. It is excluded because of the presence of the hidden twin in the group. Studying an example is the best way to understand this rule.
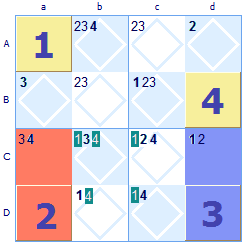
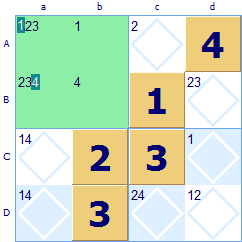 Look at this 4x4 grid. There are a lot of easier squares that could be filled in, but we've ignored them as we are illustrating the hidden twin rule. Look at the green region Aa, none of the squares have yet been allocated. Both 2 and 3 must go somewhere in the region but it turns out that there are only two possible squares. So we have detected a twin {2,3} in squares Aa and Ba. Because of this twin the possibility of a 1 in square Aa can be safely excluded (highlighted with white text on green).
Square Ba looked like it might be a 4 but this too can be excluded due to the same {2, 3} twin. How does this work? There are only two ways that the twin of {2, 3} can be allocated, either the 2 in Aa and 3 in Ba or alternatively 3 in Aa and 2 in Ba. These are the only two ways that {2, 3} can be set in this region. These are the only two possible ways that the squares Aa and Ba can be allocated. This does not allow the possibility of the 1 being allocated in Aa or the 4 being allocated in Ba - they must be allocated somewhere elsewhere in the group. Whenever there are the same number of possibilities restricted to the same number of squares this logic can be applied. [See the theory page for further explanation.] Note: The rule for twins extends to triplets too. If you find that three symbols have only three shared possible squares in a group (row, column or region) then all other possibilities in these three squares can be discounted. And on it goes, the same rule applies to quadruplets, quintuplets etc. but these are very rarely found in Sudoku puzzles.
Look at this 4x4 grid. There are a lot of easier squares that could be filled in, but we've ignored them as we are illustrating the hidden twin rule. Look at the green region Aa, none of the squares have yet been allocated. Both 2 and 3 must go somewhere in the region but it turns out that there are only two possible squares. So we have detected a twin {2,3} in squares Aa and Ba. Because of this twin the possibility of a 1 in square Aa can be safely excluded (highlighted with white text on green).
Square Ba looked like it might be a 4 but this too can be excluded due to the same {2, 3} twin. How does this work? There are only two ways that the twin of {2, 3} can be allocated, either the 2 in Aa and 3 in Ba or alternatively 3 in Aa and 2 in Ba. These are the only two ways that {2, 3} can be set in this region. These are the only two possible ways that the squares Aa and Ba can be allocated. This does not allow the possibility of the 1 being allocated in Aa or the 4 being allocated in Ba - they must be allocated somewhere elsewhere in the group. Whenever there are the same number of possibilities restricted to the same number of squares this logic can be applied. [See the theory page for further explanation.] Note: The rule for twins extends to triplets too. If you find that three symbols have only three shared possible squares in a group (row, column or region) then all other possibilities in these three squares can be discounted. And on it goes, the same rule applies to quadruplets, quintuplets etc. but these are very rarely found in Sudoku puzzles.
This rule is named the hidden twin rule as the twins are only found by considering other squares in the group. Discovering the twins is the challenge.
Naked Twin exclusion Sudoku rule
 Another way to exclude possibilities in a group is with naked twins. In this case the twin squares are evident on their own (and this is why they are termed ‘naked’ rather than the previous ‘hidden’ case). They exclude possibilities in other squares in the same group. Here's how it works.
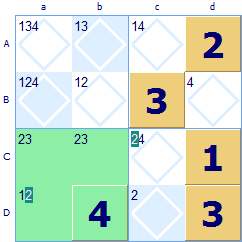
This 4x4 Sudoku has the region Ca highlighted in green. The ‘naked twins’ are located in Ca and Cb with possibilities {2, 3}. Because these two squares have no other possibilities we can deduce that a 2 must go in Ca and 3 in Cb or else 3 in Ca and 2 in Cb, there are no other alternatives for these two squares. So looking at square Da the naked twin rule excludes 2 from occurring here (because we have just shown that region Ca must have a 2 in either Ca or Cb). As Da is now left with a single possibility, a 1 can be safely allocated there. Looking at row C which also contains the naked twin, the rule eliminates 2 from square Cc and a 4 must go there.
Chain permutation Sudoku rule
The two twin rules are examples of a more general logic. It is all down to permutations - explained in detail on our theory page. Each Sudoku group is a permutation of the numbers 1 to 9 (for a 9x9 grid). If you can identify a group within this permutation that is restricted to the same number of squares then you have a Sudoku permutation rule. In fact the ‘only square’; ‘single possibility’ and ‘only choice’ are just special cases of this general rule - only one square is involved in this case. This general rule has more exotic applications.
The twin, triplet, quadruplet rules just reflect different number of possibilities (2, 3, 4...). However there are also chains. A chain can take in any number of squares, for example if three squares in a group allow just the possibilities {1, 7}; {4, 7} and {1, 4} there is a closed chain of three symbols {1, 4, 7} which is neither a twin nor a triplet. Detecting this chain lets you safely exclude a possible 1, 4 and 7 elsewhere in the same group. So the logic applies equally for chains as it does for twins, there are 'naked chains' and 'hidden chains'.
X-Wing and Swordfish
One of the more complex Sudoku strategies is the ‘X-Wing’ and its cousin the ‘Swordfish’. These rules are needed in really difficult Sudoku puzzles when all else has been tried and failed.
In looking for twins and permutations we restricted ourselves to looking at possibilities within a single group. The shared sub-group rule is the simplest example of a rule where two groups are looked at to eliminate possibilities. The X-Wing also requires looking at more than one group. A better name for this strategy might be ‘Box’ as you are looking for four squares forming the corners of a box. These squares must be the only permitted squares for that number in that row (or column) for one particular symbol. This box arrangement forms a two dimensional link. If the symbol spotted occurs in the top left corner of the box it must then also occur in the bottom right corner of the box. The only other alternative is that it occurs in the top right corner in which case it must then occur in the bottom left corner. No other option is possible for these four squares and this number. Just as with the sub-group rule, this can knock out possibilities somewhere else in the Sudoku puzzle.
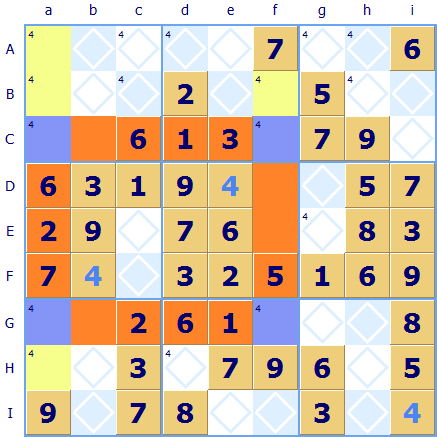
Here's an example (and good X-Wings are hard to find). Sudoku Dragon has highlighted all the squares where a 4 is allocated or looks like it can be allocated. The rows C and G are crucial. They both have only two squares that can take a 4: Ca, Cf, Ga and Gf - highlighted in blue - this is the vital starting point. Moreover these 4s form the corners of a rectangular box (highlighted in blue). How is this useful? Well, because there must the 4 in column a must either go in Ca or Ga and nowhere else in that column. Similarly in column f (the 4 must be in either Cf or Gf and so we can exclude all the other 4s from these two columns. So all the yellow highlighted squares Aa, Ba, Bf and Ha can have the possibility of 4 safely discounted. If you are lucky then eliminating the 4s will mean you can allocate one of these excluded squares. Note: The term X-Wing is probably derived from the name of the Star Wars fighter ➚ which had an X shaped cross-section.
see it in Sudoku Dragon click here...
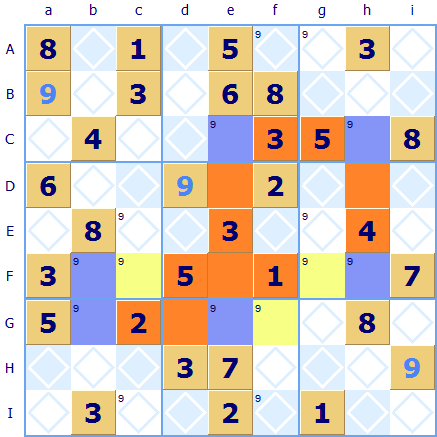 Believe it or not the complexity does not end at the X-Wing, the Swordfish is a further refinement of the X-Wing. Instead of four squares forming a box of possible allocations the Swordfish rule uses six squares. In the example puzzle there are not just two pairs of squares for 9 but three pairs: in columns b; e and h. These squares are highlighted in blue/purple color. They are linked by rows to form a box with an extension 'sword' jutting out on one side : hence the term Swordfish ➚. The other squares forming the swordfish are highlighted in orange and yellow. Because all these three columns have coinciding end squares the rule applies again. Any 9s that we find in rows that link the columns can be safely excluded because we know that a 9 must occur in one of the two highlighted squares in that row; they can't be allocated elsewhere. These excluded squares are highlighted in yellow (Fc; Gf and Fg).
Of course, the Swordfish is not the end of the matter we can extend the logic to four interlinking pairs of possibilities and then five etc.. You'll feel a real sense of achievement if you locate a Swordfish and use it to solve a Sudoku puzzle.
see it in Sudoku Dragon click here...
More advanced strategies
Further complex strategies are available for fiendishly difficult puzzles. They require a lot more thought and analysis to learn about and use correctly. The techniques include the X-Y Wing or Hook and powerful Alternate Pair , they are explained in full on our separate Advanced Strategy page.
Backtracking or solving by Trial and Error
When all else fails, there is one technique that is guaranteed to always work, indeed you can solve any Sudoku puzzle just using just this one strategy alone. You just work logically through trying each possible alternative in turn for every square until you find the solution. If you choose a wrong option at some stage later you will find a logical inconsistency and have to go back, undoing all allocations and then trying another option. Because there are so many alternatives (billions) you won't want to use this technique too often. You start with a square and choose one number from the available possibilities. This is a completely different type of strategy as it uses brute force rather than logic. Many believe this is not really a proper Sudoku solving technique as no real skill is involved. We have a full description of it with examples on a separate Guessing page.
See also
Sudoku Strategy ➚ Some of the more complex puzzle solving strategies explained.
Sudoku Solution Hints ➚ Good introduction to the various strategies for solving puzzles including X-Wing; XY-Wing.
Solving Sudoku ➚ Detailed step by step solution of Sudoku puzzles.
Please share your interest on Facebook, Twitter, Pinterest, Tumblr or Mix using the buttons. Please visit our (secure) contact page to leave any comments you may have.

Any comments on this page? Click here to contribute.
Copyright © 2005-2024 Sudoku Dragon