
Advanced Sudoku Strategy
Today's Dragon Tip
Display themesTired of the same look to your Sudoku puzzles? We offer a whole range of puzzle display themes and the ability to devise and add your own ones. All colors, fonts and sizes can be easily customized to suit your taste.
Read More
When you have mastered the core strategies you can tackle almost any Sudoku puzzle. With the full range of tactics even puzzles categorized as ‘fiendish’ and ‘challenging’ can be solved. And yet one of the delights of Sudoku is that there is another level of advanced strategy to call upon that distinguishes Masters of Sudoku from the rest. It is amazing that such an apparently simple puzzle can be so complex.
Colorful Sudoku Puzzles
When describing the X-Wing and Swordfish on our strategy page we introduced a good deal of logic. The tactics involved looking beyond one or two groups of squares in isolation in order to tackle interlocking groups. Both these strategies rely on looking at pairs of squares. They look through the available choices for allocation and finds squares that when all alternatives taken together can rule out other options. The ‘pair rule’ applies for squares where a number can only go in one of two squares in the same group (in a row; column or region), but if there are three or more squares the rule can not be used.
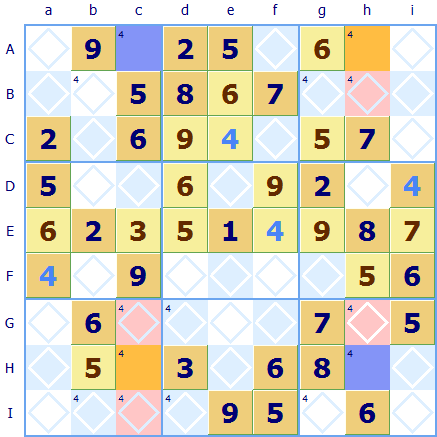
Here is an example of a Sudoku X-Wing. There are two rows where there are only two squares which can take a 4 (rows A and H) These match up by columns to form a box. There are only two alternative allocations for 4 in either Ac and Hh or Ah and Hc. This is much clearer to see with blue and orange coloring for the squares. Either the blue squares take a 4 or the orange squares take a 4. This is useful because it's now definite that a 4 occurs in both column c and column h so all the squares that also looked as though they could have taken a 4 in these two columns can be discounted (these are shown in pink). Using alternate colors helps to show this. [The Sudoku Dragon program supports six different colors for you to mark squares.]
see it in Sudoku Dragon click here...
Sudoku Solver
 So now let's turn to the Sudoku Swordfish to see if coloring helps there too. In this Swordfish there are three rows (A, B and H) all with a pair of possible squares that could take a 6. As the squares are located in just three columns b; g and i they form a 'Swordfish'. The 6s must either go in all the blue squares or all the orange squares, they can not be allocated any other way. Because the three columns b; g and i all contain both a blue and orange square then a 6 can not go in any other square in these columns. So the pink square Gi can not actually take a 6 even though it looks as though it could do. Coloring the pairs has made it easy to see what is possible.
Alternate Pair Sudoku exclusion rule
The X-Wing and Swordfish are examples of a more general rule. This is always satisfying for a mathematician, by looking at simple examples it is possible to extend the same logic to a general rule (this is the basis of proof by induction ➚).
If you identify pairs of squares in the same row; column or region for the same number you can start coloring them. If one of the pair is also a pair in another group (row; column; region) you can use the same alternating coloring for that pair. These are termed ‘alternate pairs’ as the true allocation must be in one of the two alternative squares in the pair. [You will sometimes see these called ‘conjugate pairs’ on other sites, but as this term comes from mathematics, it is not very descriptive.]
When you have finished coloring the linked pairs you can analyze the pattern of colored squares. If you find a group (row; column or region) that has both colors then any other square that could take that number can be safely excluded as a possibility. This general rule covers not only the X-Wing and Swordfish types but a range of other patterns of possibilities. Let's look at an example.
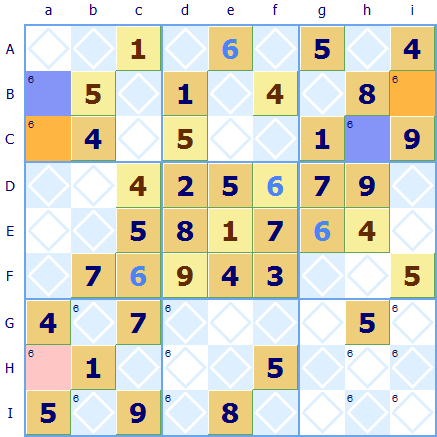 Here is a grid with the possibilities for 6 colored. There are pairs of possibilities for 6 in row B and C as well as region Ag (it is often a pair in a region that proves most helpful). The pair in column b does not interlink with another pair and so does not help. The coloring shows that column a has both an orange and a blue square in it so the 'possible' 6 in square Ha (pink) can be dismissed as actually impossible.
Sudoku Dragon can automatically highlight alternate pairs for you and uses the alternate pair strategy to solve difficult puzzles.
see it in Sudoku Dragon click here...
However the hard work of alternate pair coloring is not guaranteed to help solve squares. Because it takes so long to work through, it is a technique to hold in reserve for very tricky puzzles. Pairs are most frequently found whether you have a dozen or so possible squares left for a number, they are not as common at the beginning or end of Sudoku puzzle solving.
Alternate Pair Deduction
Just when you thought Sudoku solution strategies were becoming too mind blowingly complex, there are yet further twists to be added. It is another excuse to get out your crayons and start coloring Sudoku squares. The approach differs slightly to ‘alternate pair exclusion’ in the previous section, the pairs are identified and colored in just the same way but the logic used is different. If after coloring you have any group with two squares of the same color then something is distinctly wrong as that implies you could have two squares with the same symbol in the same group. If two or more squares have the same color then this particular color assignment is impossible and the other color must be the correct one and all those squares can all be allocated as the only possible squares for the symbol. Here is an example:
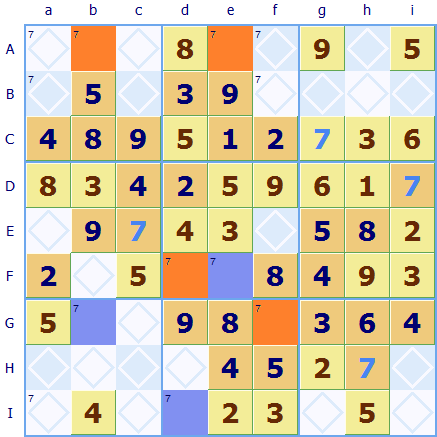 Starting with orange for the square Fd and blue for its alternate row pair Fe, the pairs in column e come into play and orange goes into Ae. From Fd there is a pair in column d so blue for Id, then following the pair in row I orange goes in Ia, now there is a pair in region Ga which means Gb must also be blue.
Finally column b is a pair so Ab is orange. So we end up with two orange squares in row A, which can not be right. If the 7s went in the orange squares there would be two 7s in row A. So the 7s can not go in the orange squares they must go in the blue squares Fe;
Gb and Id.
Starting with orange for the square Fd and blue for its alternate row pair Fe, the pairs in column e come into play and orange goes into Ae. From Fd there is a pair in column d so blue for Id, then following the pair in row I orange goes in Ia, now there is a pair in region Ga which means Gb must also be blue.
Finally column b is a pair so Ab is orange. So we end up with two orange squares in row A, which can not be right. If the 7s went in the orange squares there would be two 7s in row A. So the 7s can not go in the orange squares they must go in the blue squares Fe;
Gb and Id.
see it in Sudoku Dragon click here...
Multi-colored Alternate Pairs
Once you have mastered Alternate Pairs in Sudoku it is also worth looking out for another application. When you color a grid you will quite often find there are two independent chains of interlinked pairs. You will need two more colors to mark up the other set of pairs and you end up with a very colorful grid! The network of linked colored squares can restrict and force square allocations rather like in the case of a single network of colored pairs.
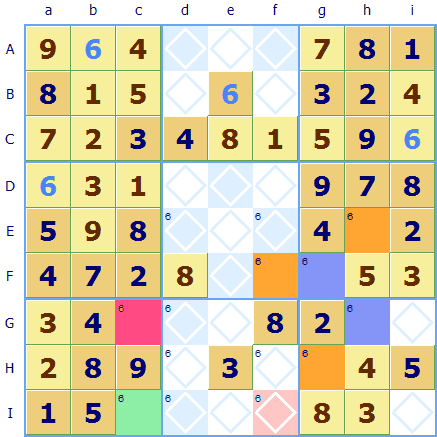 Here's a Sudoku puzzle with all the squares that can take a 6 have been marked using the Sudoku Dragon program. There are some useful looking pairs. In region Dg the orange square Eh and blue square Fg which links on Row F to orange pair Ff, and Eh links through column h to blue square Gh.
Square Fg links through column g to orange Hg. That completes that set ,but there is another pair in column c. Square Gc has been colored red and Ic green. Now the crucial fact is that the two sets are related via row G (NOTE: the possibility of a 6 in Gd forbids the two sets being fully interlinked). If a 6 were to go in the blue squares it could not go in the red square it would have to go in the green square Ic.
Alternatively if a 6 was correct for the orange squares then this does not intersect with the red-green pair directly so it can't be deduced which one is correct.
However, putting the two alternative options together where the orange and green squares intersect it's now possible to work out which squares can not take a 6. In this example it is square If marked in pink. Either there is a 6 in orange square Ff or a 6 in green square Ic so both possible cases forbid a 6 in the pink square If which intersects this row and column.
Here's a Sudoku puzzle with all the squares that can take a 6 have been marked using the Sudoku Dragon program. There are some useful looking pairs. In region Dg the orange square Eh and blue square Fg which links on Row F to orange pair Ff, and Eh links through column h to blue square Gh.
Square Fg links through column g to orange Hg. That completes that set ,but there is another pair in column c. Square Gc has been colored red and Ic green. Now the crucial fact is that the two sets are related via row G (NOTE: the possibility of a 6 in Gd forbids the two sets being fully interlinked). If a 6 were to go in the blue squares it could not go in the red square it would have to go in the green square Ic.
Alternatively if a 6 was correct for the orange squares then this does not intersect with the red-green pair directly so it can't be deduced which one is correct.
However, putting the two alternative options together where the orange and green squares intersect it's now possible to work out which squares can not take a 6. In this example it is square If marked in pink. Either there is a 6 in orange square Ff or a 6 in green square Ic so both possible cases forbid a 6 in the pink square If which intersects this row and column.
see it in Sudoku Dragon click here...
Further twists
What was achieved with pairs could equally be achieved with triplets or quadruplets of possibilities. All that is needed is to work through the logic and see if all the three or four alternatives all combine to have a common implication. However these are too rare and too hard to identify to be of practical use.

Hook or X-Y Wing Sudoku rule
When I first saw the term X-Y Wing I thought someone had just mistyped X-Wing or that it was yet another variant of it. It turned out that the Sudoku X-Y Wing is another advanced strategy separate from pairs but once again using the ‘either-or’ logic that flows from analyzing connected groups.
To avoid confusion we'll use the term Hook for this technique. Under rather special circumstances, the Hook knocks out other possibilities. A hook (or X-Y Wing) requires you to find three squares. The squares must all have two possibilities each in three different numbers. The three squares form a chain of pairs of possibilities. An example of such a cyclic chain is [2; 5] [5;7] and [7;2] expressed this way you can see the chain of possibilities as [2 » 5 » 7 » 2]. The location of these squares is all important, two must be in the same row or column, they form the 'stem' of the hook and the other square must be in the same region as one of the other two squares.
Correct identification of where a Hook is located is all too easy to slip up on. But how is this obscure relationship useful? Well the way these squares are arranged restricts possibilities elsewhere in the puzzle. If in our example the stem contains [2,5] and [5,7] then 5 is the stem number and the [2,7] the branch or hook. If 5 is the correct choice for the [2,5] square then that means the [5,7] square must be 7. The only alternative for the [2,5] square is 2, now if this is 2 then this forces the [2,7] square to be 7 and therefore the [5,7] square must be 5. These are the only two alternatives and if there are any squares where a 7 is not possible for both then we can safely exclude 7 as a possibility for them.
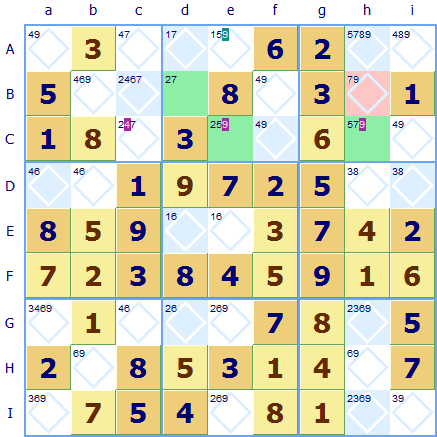 Here are some pictures of a real puzzle that may help. It is a Sudoku at a stage where all the easy squares have been allocated.
The light green squares are of interest, they are Bd that can be only [2,7]; Ce that can take [2,5] (the 9 is not possible because of the naked twin [4,9] in row C) and Ch that can take [5,7] ) (the 9 is excluded for the same reason). So we have our chain [2,7] [7,5] [5,2] of three squares. The last two form the stem of the hook and 7 is the hook number. Following our logic if the 2 went in Ce this means a 7 must go in Bd and a 5 in Ch. So this gives us the following segment of the grid.
see it in Sudoku Dragon click here...
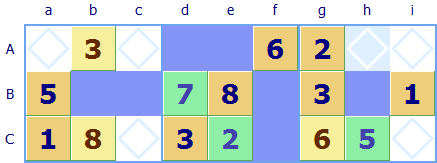 The green squares are the ones we have tentatively allocated and the blue squares indicate where a 7 can not be allocated.
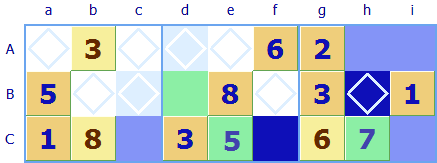 The only other option for Ce was for it to be a 5 rather than a 2, and this forces us to put a 7 in Ch. So now we have the alternative scenario with Ch and Ce highlighted in green and for this alternative the blue squares show other squares which can not take a 7.
Well, we are in luck as there are two squares which are blue in both the alternatives, that is square Bh and Cf - which we have highlighted in dark blue. Square Cf is not particularly helpful because we already knew a 7 could not go there - there is a 7 in column f (Square Gf). Square Bh can not be a 7 for either of the only two possibilities available for Ce (5 or 2) and so 7 can be safely excluded from the possibilities for this square. In the case of this particular puzzle, this is crucial, as that leaves only one choice for Bh as it can not be a 7 it must be the remaining possibility of 9, the hook strategy enables us to immediately solve a square and it turns out to be the last tricky one to be solved.
The Sudoku Hook is a general technique, the term X-Y Wing name comes from its mathematical formulation as three squares containing [x, y]; [y, z] and [x, z]. (In our case x=5; y=2; z=7). It tells us that the shared squares where the two alternative allocations for z intersect can not possibly contain a z.

Any comments on this page? Click here to contribute.
Copyright © 2005-2024 Sudoku Dragon